Elk Creative Earns Game-Changer Ranks on Clutch

When starting a business, one of the most important components to think carefully of is branding. If you look around, some of the most successful companies across the world invest heavily on consistent, quality, and impactful branding solutions. 

We at Elk Creative, we go what you need. Founded in 2005, we are a Melbourne-based branding and web design agency that loves thinking outside the box. We are passionate about crafting stunning and engaging solutions tailored to fit our clients’ needs. We make sure they feel confident and empowered with us as their go-to partners.

Because of our unwavering commitment and the quality of our work, Elk Creative is listed on Clutch’s rankings of game-changing branding agencies in Melbourne.

For those of you who aren’t familiar with Clutch, it’s an independent B2B reviews and ratings website designed to help browsers connect with reliable service providers. The site is known for its extensive collection of data-driven content encompassing the design, IT, marketing, and business services sectors.

The distinction of game-changer is given to the finest companies that consistently prove they can deliver impactful and high-quality services. The honest reviews provided by our gracious clients showed why we deserve this honor, helping us earn this distinction.

From the entire Elk Creative team, thank you so much to everyone who believed in us. We sincerely appreciate you all. Cheers to more incredible opportunities ahead!

“The most impressive thing about Elk Creative is that they genuinely listen to us, which produces the results we ask for. The Elk Creative Team is always happy to make whatever changes we need. However, they listen to what we want, so we normally don’t require many changes. I find them easy to work with.” — Co-Owner, CleanEasy

“The design we’ve received is bold and colorful, which is very hard to get right. Elk Creative nailed it. The brand guide has made it extremely easy to create new creatives, without having to engage a designer every time. For example, we can put together flyers, social banners etc very easily just by following the guidelines. That was a big problem with our previous brand.” — Director, Content Snare

Let’s inspire brands and create brilliant identities together. Connect with us right away and let us know how we can work together.

Attending Design Conferences of Australia

If you’ve been to a large multi-day design conference before, you know how valuable they can be. Every year we try our to attend as many of the best conferences as we can. They are a great way to meet new people, learn new ideas and be inspired throughout the year. Getting up close and personal with some of the leaders within the creative industries is an amazing experience and things you take away can last with you for a long time.

Design conferences can even change your whole outlook or impact your process and level of work. So whether you’re looking for inspiration, or to network with new people with similar interests, keep up with current trends or to learn something new and develop your understanding of the design industry. Going to a conference is a great way to do this.

It can often feel like an expense and it’s not always easy to find the time, but the payoff is always worth it. While some of the biggest conferences are overseas, there are many great design conferences in Australia.

We’ve listed some of our favourites below, we’ll continue to add to these and change the dates as they get updated. We hope to see you at one of the next events. Here’s a shot from the 2018 Design Conference in Brisbane.

The Design Conference Brisbane
May 09-11 2018
Brisbane Powerhouse
119 Lamington St, New Farm QLD 4005
https://thedesignconference.com.au


MYRIAD
May 16-18 2018
Brisbane Showgrounds
Bowen Hills, Brisbane, Queensland
https://www.myriad.org/


Semi-Permanent
May 24-26 2018
Carriageworks
245 Wilson St, Eveleigh NSW 2015
https://www.semipermanent.com/


Creative State Summit
14-15 June 2018
Melbourne Museum
11 Nicholson St, Carlton VIC 3053
http://creativestatesummit.com/


Make it Made it
7 July 2018
Newcastle Conservatorium
Cnr Laman Street, Auckland St, Newcastle NSW 2300
http://makeitmadeit.com.au/


WordCamp Sydney 2018
28 & 29 July
University of Technology Sydney
15 Broadway, Ultimo NSW 2007
https://2018.sydney.wordcamp.org/


Adobe Symposium
2-4 August 2018
International Convention Centre Sydney
14 Darling Drive, Sydney, Australia
https://www.adobe.com/au/events/symposium.html


Typism
15-16 August 2018
The Arts Centre Gold Coast
135 Bundall Rd, Surfers Paradise QLD 4217
http://www.typism.com.au/


Web Directions Summit
1-2 November 2018
International Convention Centre Sydney
14 Darling Drive, Sydney, Australia
http://www.webdirections.org/wds/


Pivot Summit
Friday, 7 December 2018
The Federal Mills
33 Mackey Street, North Geelong, VIC 3215
http://pivotsummit.com.au/


Pause Fest
7-11 Feb 2019
Fed Square, Melbourne
Swanston St & Flinders St, Melbourne VIC 3000
http://www.pausefest.com.au/

Branding your WordPress login.

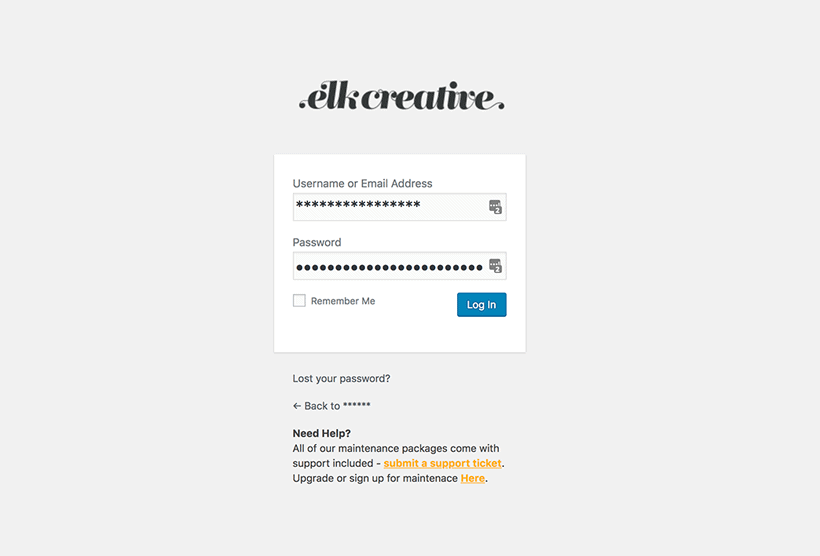
For a while now, we’ve been customising the WordPress login. Now we don’t do this to “hide” that we use WordPress. It’s simply an easy way to create a branded experience for all of our clients. We also add a custom footer with links to log a support ticket or upgrade maintenance plans. This is a simple prompt and an easy way for people to reach out for the help they require. So what does this look like?

This might all seem like overkill but it if helps just 1 client save time, it’s worth the extra step. Once you have this process in place it should only add a minute at most to implement on any site. So how do we do it? Read below.

Updating the logo.

The first and simplest thing to update is the logo. Make your logo, don’t go wider than 300px. Now if you have a square (or round) icon you want to use, it might be simplest to make it the same size as the WordPress icon 84px – then you wont need to use the width, height or background property in the inline CSS listed below. 

OK, so upload your logo. We keep core theme assets relative to the core CSS file in a folder name img. But you can use whatever you want. If you choose to upload this to the WordPress media library, just get the full URL to the image and paste that as your image address. Once you’ve done that, copy this code below to your functions file (remember to update the image address and CSS styles as required). 

//* Add logo to admin page
function custom_login_logo() { ?>
    <style type="text/css">
        #login h1 a, .login h1 a {
            background-image: url(<?php echo get_stylesheet_directory_uri(); ?>/img/login-logo.png); 
            width: 300px; 
            height: 55px;
            background-size: inherit;
        }
    </style>
<?php }
add_action( 'login_enqueue_scripts', 'custom_login_logo' );

Adding a custom Footer

Adding the custom footer is as simple as working out what your message is. If you have pages you wish to link to you’ll need to write up your HTML for this. Once you’ve got that done, simply copy and paste the code below into your functions file with your own personal message. 

function custom_login_footer() { 
?><p style="width: 272px; margin:1em auto;">
        <b>Need Help?</b><br>Your own personal message goes here.
    </p><?php 
}
add_action('login_footer','custom_login_footer');

Job done. Now any project moving forward keep that logo handy and your new function.

WordPress Plugins Basics – Getting Started

WordPress Geelong

Aren’t WordPress plugins great? Of course, they are. These days it seems like there is a plugin for almost anything you can think of. From the mandatory such as SEO & security plugins to complex systems such as selling products & creating courses, all the way to the ridiculous such as theme roulette or even a Chuck Norris joke widget.

But with so many plugins now on offer (getting close to 50,000 on the WordPress Directory) being able to find the right one can be daunting and worse, selecting the wrong one could turn into a major headache.

What are the first things we suggest before even looking for a plugin?

1) Don’t add another plugin.
Wait, What? Wasn’t I meant to give you advice on finding good plugins? Well yes, but not using a plugin is a great option. Always try to limit your plugin usage. Having too many plugins will slow down your website and increase your venerability to security threats and attacks.

2) Focus on benefits.
Similar to the above, before you get started you should ask yourself if you need the feature, how will it benefit the site, your customer experience, increase your engagement or your website’s conversion. People rush into using plugins for things that are simple to do or unnecessary.

3) Define your requirements.
Quickly list what you are trying to achieve, if you have a clear idea of what you want before you start looking you will know what to avoid and when something either doesn’t meet your requirements or has too many additional features (which can bloat your website and make maintenance time consuming).


How do you know if a plugin is one you want to install?

1) Stars & Votes.
When you search starts, votes and reviews will give you an idea of any potential complaint or issue, read them see if the complaints sound like they might be issues you will come up against, some negative comments can be based on lack of features that might not be a problem for you so spend some time and read through people’s feedback. The number of stars/votes, of course, is important. Something can look like it’s a 5 start plugin but only have 4-5 votes (probably from the developers themselves), so keep an eye out for that.

2) Update – Dates and version.
It’s always ideal to find a plugin that’s been used for a while and that is being maintained. Many people offer “light” free versions of plugins and sell a premium one and if the plugin is popular enough then it has a much higher chance of being kept up to date as new WordPress updates are rolled out or new vulnerabilities are found.

3) Research.
Google is your friend, do a quick search and see what others are saying.

4) Backup your site, then try it out.
Always take a backup of your current WordPress site so if something goes wrong you can get your site back up and running. If you have a development site, always try the plugin out there first. You can set up a local copy of your website running on your own computer, this is a fast and safe way to test out plugins. Once you know they are behaving as you want, then install them on your site.


How to install a Plugin:

There are various ways in which you can do this, but the simplest by far is to log into your WordPress account and in the left-hand menu you will see the Plugin Menu and searching for the plugin name or type. This only list’s plugins that are in the WordPress directory. With premium plugins or plugins not listed in the WordPress directory, you can download the plugin as a Zip file and upload this to your WordPress by going to the Add New plugin and finding the “Upload Plugin” button.


If you do not see this, your account may not have full admin privileges or you may be using WordPress.com which will not allow you to add plugins.


Paid vs Free plugins:

The majority of plugins around are free, you may think “why would I ever pay for a plugin” but the reasons should simply come down to if it does the job better. Some of the best plugins are free but there is no doubt that some of the most powerful plugins around come with a subscription fee.


Our favourite plugins:

There are some plugins for me that are almost mandatory on all projects, these range from SEO, Security, Custom Admin Template theming, forms and eCommerce, these include Backup Buddy, iTheme Security, Yoast, Advanced Custom fields, Gravity Forms, Jetpack and WooCommerce for online shopping.

WordPress Page Builder with Advanced Custom Fields

I’m a big fan of the Advanced custom fields plugin. Not only is it extremely flexible it also handles the job of many plugins in one package so it reduces the need for excess plugins (because you should always keep plugins to a minimum). The code it produces is light weight and you to have control of your HTML, CSS, and JS eliminating the code bloat of most plugins around. Once you learn the basics you’ll find many creative ways coming to use it to provide custom solutions that fulfil your website requirements. It integrates seamlessly into the WordPress backend UI making updates in WordPress once it is set up. All round it’s a win-win for me.

There are many guides on setting up basic custom fields but here’s a technique that I have developed for creating a clean and simple page builder. Yes, there are many page builders around but from reviewing these do all excess code bloating your site files, they also have many options that make things not only confusing for the end user making updates but can allow for updates that neglect a style guide and go “off-brand”. I’m a firm believer in brand consistency so this is an issue.

Custom Coded – Getting your hands dirty.

This technique uses the flexible content feature, which is similar to the repeater, this allows us to add multiple (and varied) content layouts that are custom to the project requirements and give you control over the output HTML and CSS.

First of all, let’s look at how I’ve set up the flexible content repeater within WordPress and how the final result.

Here’s the code to get this into the template:

<?php
// loop through the rows of data
while ( have_rows('multi_content') ) : the_row();
if( get_row_layout() == 'single_column' ):
?><hr><div class="single"><?php the_sub_field('single_text_area'); ?></div><?php
endif;if( get_row_layout() == 'double_column' ):
?><hr><div class="columnOneHalf"><?php the_sub_field('content_left'); ?></div><?php
?><div class="columnOneHalf NoEndSpace"><?php the_sub_field('content_right'); ?></div><?php
?></div><?php
endif;if( get_row_layout() == 'tripple_column' ):
?><hr><div class="columnOneThird"><?php the_sub_field('content_left'); ?></div><?php
?><div class="columnOneThird"><?php the_sub_field('content_middle'); ?></div><?php
?><div class="columnOneThird NoEndSpace"><?php the_sub_field('content_right');?></div><?php
?></div><?php
if( get_row_layout() == 'spacer' ):
?><div class="lineSpace"><?php the_sub_field('line_space'); ?></div><?php
endif;endwhile; ?>

The CSS:

The CSS can be styled as you like, for the example shown above, I’ll keep things pretty simple and lightweight:

.columnOneHalf, .columnOneThird { width: 96%; margin: 2%; }
@media only screen and (min-width: 768px) {
.columnOneHalf { width: 48%; margin-right: 4%; float: left; }
.columnOneThird { width: 31.3%; margin-right: 2%; float: left; }
.NoEndSpace { margin-right: 0;}
}

Generated WordPress Code – ACF Theme Code Pro

If you are looking for an easier way to work with custom WordPress themes, or intended to use Advanced Custom Fields regularly you’re in for a treat. There is another plugin that can be added to your site to automatically generate your template code, along with conditional statements and anything you can think of.

wordpress-advance-custom-flields

That plugin is ACF Theme Code Pro and it is really easy to use, best of all once you have finished setting up your custom templates and fields, you can remove ACF Theme Code Pro which allows you to keep your plugins to a minimum. While this is a premium plugin, it’s well worth the investment if you take WordPress template customisation seriously.

For more code snippets and examples of what ACF can do for your website, visit the ACF resources page.